
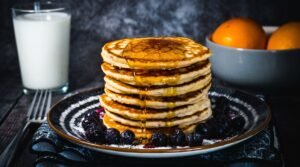
When I first made pancakes by myself, the first to land in the pan looked just like coasters. Flat and a little gray in the middle, they were so chewy that my roommate said we could use the battered ones to level the kitchen table. I’d beat the batter into submission-I thought smooth was what I wanted. It took another few Sunday mornings to realize that I’d been overdoing it. After I relaxed and stopped trying to get rid of every lump, the pancakes grew thicker and softer.
This is the incarnation I’ve whipped up more times than I can count. A basic buttermilk stack with a touch of melted butter for flavor and just enough leavening to make the stack rise. Works on a school morning when you have 20 minutes before someone needs a ride, and is flexible enough that even a half-distracted cook can produce something pretty decent. The batter requires just a quick wait before tossing it onto the griddle (that’s the step a lot of cooks skip).
I’ll admit it: your first pancake will be the sacrifice pancake. Mine always is. Since every stove heats a little differently, it takes a little experimenting to find the perfect heat, but the kitchen will smell deliciously of butter and toasted flour, and the stack will come off the pan tall and pillowy.
Quick Recipe Info
Prep Time 10 minutes
Cook Time 20 minutes
Total Time 30 minutes
Servings 2 (7 pancakes per, 14 pancakes in total)
Difficulty Easy
Ingredients
For the pancakes
1 ½ cups (190 g) all-purpose flour
Add the flour to your measuring cup by spooning it in and then leveling it off. Scooping directly from the bag compacts the flour and can result in dense pancakes.
2 tablespoons granulated sugar
2 teaspoons baking powder
½ teaspoon baking soda
½ teaspoon fine sea salt
1 ¼ cups buttermilk (300 ml), well shaken
If you have no buttermilk? Mix 1 tablespoon lemon juice or white vinegar with 1 ¼ cup regular milk and set aside for 5 minutes until it is a bit curdled.
1 large egg (can be cold). If you think of it in advance and take it out of the fridge to get to room temperature
3 tablespoons unsalted butter, melted and slightly cooled, plus more for greasing the pan.
1 teaspoon pure vanilla extract
For the topping
¾ cup pure maple syrup
Use real maple syrup – not pancake syrup. It will taste so much better and is great to warm up a little before you serve it.
About 20 fresh blueberries (roughly ¼ cup)
1 to 2 tablespoons confectioner’s sugar, for dusting
Step-by-Step Instructions
- Prepare the oven and the warming syrup preheat oven to 200F (95C) and position a wire rack on a baking sheet as shown. This is where finished pancakes will wait while you cook the remaining pancakes so that the pancakes stay warm but aren’t getting soggy on a plate. Place the syrup in a small saucepan and warm the syrup over the lowest heat for 1-2 minutes. The syrup should be warm but not boiling. Turn the heat off and leave the pan on the back burner.
- Whisk the dry ingredients. Whisk the flour, sugar, baking powder, baking soda, and salt together in a large bowl. Whisking ensures that all the clumps are dispersed and everything is evenly coated with leaveners, so you don’t hit a bitter, soda-heavy bite.
- Add the wet ingredients. Whisk the buttermilk, egg, butter and vanilla in a jug or bowl until combined. This may be a little streaky where the butter hasn’t fully blended in – it’s OK!
- Mix in gently. Add wet to dry and stir with a rubber spatula until you no longer see dry flour, 10-12 strokes or so. The batter will be lumpy, with some small pockets of flour. Don’t whisk until the batter is smooth, because the pancakes will be dense and rubbery. Really. This is the step that makes all the difference.
- Time to relax the batter. Pour to the side of the bowl for 5 minutes. This is the flour sucking up the water, the batter now thickens a little and tiny bubbles should appear on the top – this is the baking powder activating and you know it will make your pancake fluffy.
- Preheat the pan Use a nonstick or cast-iron skillet on medium heat. Melt a small amount of butter in the pan, then wipe most of it away with a paper towel to leave a thin film. To determine whether the pan is hot enough, sprinkle a few drops of water on the surface. They should sizzle and bounce around before evaporating; if they evaporate immediately, wait a while; if they just sit there, turn the heat up a little.
- How to make the pancakes. Spoon the pancakes. Using a ¼-cup measure, scoop the batter and pour onto the skillet, leaving an inch between pancakes. (Keep the pancakes spaced out, about 3 to 3½ inches apart.) Do not press the pancake batter down with the back of the spoon – let the batter hit the skillet.
- Hold on for bubbles. Do not flip over the pancake until bubbles form on the upper surface and on the side, or until the edge appears set and almost dry. Wait for a few bubbles to break, and then sink back down again without popping, before flipping.
- Flip one more time and settle. Place a thin spatula under each pancake and, in one easy motion, flip again. Cook for 1 to 2 more minutes, until the pancake is deep golden brown and when pressed lightly in the center the cake bounces back. (Don’t press down hard with your spatula, lest you squeeze the air pockets out.)
- Just keep the batches warm. As you finish each batch, slide the pancakes onto the rack in the oven. Scrape your pan clean and butter the pan lightly before adding each new batch, reducing heat if the pancakes are browning too quickly. I cook anywhere from 14 pancakes in 3 or 4 batches, so keep a close eye on those first few.
- Plate the stacks. Place 7 pancakes on each plate. Ladle warm maple syrup over the stack so it drizzles down the sides. Circle each plate with approximately 10 blueberries around the bottom of the stack. Using a fine-mesh strainer, dust confectioners sugar on the plate border. The blueberries and powdered sugar make everything look better and more purposeful and they stay where you put them, rather than being piled on top.
Helpful Tips
Lumps are your friend. Do not over mix until the flour is absorbed. It may seem a bit thick and lumpy, but that’s exactly what you’re aiming for.
Rest the batter! Five minutes of resting time really helps the pancakes to rise to the top. If you are making a large batch, mix the leaveners back in with a spoon before each batch.
Mind the pan. If it’s burning the outside, you need to turn it down immediately. As you want the inside to be cooked at the same time as the outside, otherwise you will get raw centre’s on your pancakes. When you first pour your pancake on the heat, if it’s darkening too quick and the middle is still wet, turn down the heat a little.
Use an ice cream scoop for rounder pancakes. A ¼-cup scoop provides uniform pancakes, so they cook evenly and flip more easily.
Leave pancakes to rest on a rack, not a plate. Pancakes placed stacked on a plate will suffocate from steam, going soggy on the bottoms. Rests the oven rack for light, crispy edges.
Heat the syrup-not boil it. Boiling alters the flavor of real maple syrup and can give it a slight burnt flavor. Bring it to a gentle simmer to thaw it out.
Changes and Alternative Versions
Blueberry Batter: Mix together ½ cup blueberries and 1 teaspoon flour and gently fold them into the batter at the end. The flour keeps the blueberries from sinking to the bottom of the cup. Top with fresh berries for garnish.
Half whole wheat: Replace ¾ cup of the all-purpose flour with ¾ cup of whole wheat, and include an additional 2 tablespoons of buttermilk if the batter seems too thick. They’ll be a little more hearty and heavier, but still tender.
Dairy-free: Substitute unsweetened oat or almond milk with the lemon juice trick, a plant-based butter and flax egg (1 tablespoon of ground flax seed whisked with 3 tablespoons of water and set aside for 5 minutes). The pancakes may be a touch shorter but will still be tender and golden.
Lemon-ricotta: To the wet ingredients, add the zest of a lemon and ¼ cup of whole-milk ricotta. The pancakes will be creamier and softer, and the lemon is great against the blueberries.
Gluten-free: Use a gluten free flour blend with xanthan gum already in it. Rest the batter for 10 minutes rather than 5, gluten free flours absorb liquids more slowly.
Storage and Reheating
Storing leftovers: Allow the pancakes to cool entirely on the rack before storing, or they’ll turn very humid in the container. When cooled, you can store them in an airtight container in the refrigerator for up to 3 days. Or if you’d like to freeze them, slip parchment paper between pancakes and keep in a zip-top bag in the freezer for up to 2 months.
Reheating: For both refrigerated and frozen pancakes, the simplest way to reheat is in a toaster. Simply throw one or two in at a medium temperature and wait. If you’ve got a stack, reheat them in a skillet over medium-low heat for about one minute per side. To warm in the microwave, wrap a pancake in a moist paper towel and microwave for 20 to 30 seconds; the pancake won’t be as light and fluffy as when fresh, but it will be close. Rewarm the syrup, too!
Last Word
I hope this becomes a regular feature in your kitchen like it has in mine. Cook up a batch on a lazy weekend morning, or make time during a hectic weekday when that stack is the only thing you have time to eat. If you make this, I’d love to hear about it in the comments below. Did your first pancake also go out in a blaze of glory? Were the blueberries in the batter or in your tummy before they could make it to a plate?