
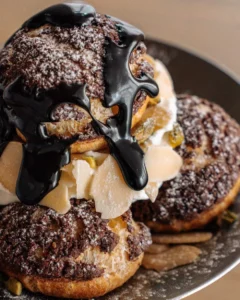
Chocolate cream puffs are light, hollow shells with a crisp cocoa cookie crust on the outside. They contain sweet vanilla whipped cream and are coated with shiny chocolate; finished off with a sprinkle of sliced almonds, chopped pistachios and some powdered sugar. The shell is crisp, the cream is soft, and the glaze has a strong chocolate taste.
They are suitable for use at birthdays, on holiday tables, at dinner parties or as part of a weekend baking project. Although they have a nice appearance, the procedure is simple if you carry out each step one at a time. You can bake the shells a day in advance and then fill them just before serving.
Ingredients You Will Need
Cocoa crunch topping (craquelin)
- 4 tablespoons (57 g) unsalted butter, softened
- 1/3 cup (65 g) light brown sugar, packed
- 1/2 cup (62 g) all purpose flour
- 2 tablespoons unsweetened cocoa powder
Choux pastry shells
- cup (120 ml) whole milk
- 1/2 cup (1 stick, 113 g) unsalted butter, cut into cubes
- 1 teaspoon granulated sugar
- 1/4 teaspoon salt
- 1 cup (125 g) all purpose flour
- 4 large eggs, at room temperature1/2 cup (120 ml) water
Whipped cream filling
- 1 1/2 cups (360 ml) cold heavy cream
- 1/3 cup (40 g) powdered sugar
- 1 teaspoon vanilla extract
Chocolate glaze and toppings
- 4 ounces (113 g) semisweet chocolate, finely chopped
- 1/2 cup (120 ml) heavy cream
- 1 tablespoon light corn syrup (optional, for shine)
- 2 tablespoons sliced almonds
- 2 tablespoons chopped pistachios
- Powdered sugar, for dusting
Notes on the ingredients
Use butter rather than margarine since margarine contains more water and can cause the shells to become flat. If you can’t get corn syrup, then omit it since the glaze will still be tasty though it will be a bit less shiny. If you don’t like nuts, then either leave them out or use shaved chocolate instead.
Step by Step Method for Chocolate Cream Puffs
Make the cocoa crunch topping
- Take the butter, brown sugar, flour and cocoa powder and mix them together in a bowl using a spatula and then your hands. The mixture should form a soft dough.
- Put the dough steadily between two sheets of parchment paper and roll it until it is about 1/8 inch thick.
- Put it onto a tray and freeze for 20 minutes until it has hardened.
- Cut 12 discs using a 1½ inch round cutter and then put the discs back into the freezer as you are making the pastry.
Make the choux pastry
- Preheat the oven to 400°F, put a rack into the middle position, and line the two baking sheets with parchment paper.
- Put the water, milk, butter, sugar, and salt into a saucepan that is of medium size and heat it over medium heat until the butter has melted and the mixture has reached a full boil.
- Take the pan off the heat and then add all the flour at one time, stirring vigorously with a wooden spoon until a thick dough has formed.
- Return the pan to low heat and cook it for 2 minutes, stirring the entire time. A thin film should then appear on the bottom of the pan. Since this step serves to dry out the dough, it must not be omitted.
- Take the dough and put it into a mixing bowl. Allow it to cool down for five minutes. It will cook the eggs if it is still too hot.
- Break the three eggs into the dough individually using a hand mixer or a strong spoon. Make sure each egg has been thoroughly mixed before going on to the next one. The dough will appear broken at first but will then become smooth.
- Take the final egg and mix it in a small bowl. Add it to the dough in small amounts; you might not need the whole egg. The dough is ready when it has a glossy appearance and separates from the spatula in the form of a thick V.
Pipe and bake the shells
- Place the dough into a piping bag that has a large round nozzle, the nozzle being about 1/2 inch in width.
- Place the 12 mounds, each roughly 1½ inches in width, onto the baking sheets, keeping about 2 inches between them. If there are any peaks, moisten your finger and gently press them down.
- Put a single frozen cocoa disc onto each mound.
- Bake for 15 minutes without opening the oven door, then reduce the heat to 350°F and continue baking for an additional 20 to 25 minutes; the puffs will be deep golden in colour, puffed and light when you lift one.
- Switch off the oven. Use a toothpick to make a small hole in the side of each puff. Put the puffs back into the oven with the door only slightly open for 10 minutes since this allows the steam to escape and keeps them crisp.
- Put the puffs on a wire rack and allow them to cool completely.
Fill and finish
- Put the heavy cream, powdered sugar, and vanilla into a cold bowl and whip them until stiff peaks appear. Then fill a piping bag with a small nozzle from the mixture.
- Make a hole in the bottom of each puff and then pipe the cream into it until it is full. Alternatively, you can cut off the top third and pipe the cream on top.
- Place the chopped chocolate in a bowl that can withstand heat. Warm the half cup of cream until it steams but not until it boils. Pour this cream over the chocolate and wait two minutes before stirring it until it is smooth. Then add the corn syrup.
- Allow the glaze to cool for between 5 and 10 minutes; it must be thick enough to drip slowly off a spoon.
- Put the glaze over the puffs, then add some almonds and some pistachios, top with powdered sugar and serve.
Why This Recipe Is Special
- The topping provides a crunchy texture; the cocoa crust bakes to form a crisp layer with a cookie-like feel and also helps the puffs to rise evenly while keeping the surface smooth.
- The shell remains hollow; when the dough is dried on the stove and the puffs are vented after baking, this results in an empty interior and a crisp exterior.
- The flavours are well balanced; the cream is only slightly sweet, the cocoa is a bit bitter and the glaze contributes richness, while the nuts provide a crunchy texture and a mild toasty flavour.
- You can do this in advance; the shells and the glaze can be prepared earlier, meaning that all you need to do is fill them just before serving.
Extra Tips for Better Taste
- We must carefully measure the flour since using too much will make the dough stiff and the puffs heavy.
- In the first 20 minutes do not open the oven since cold air will cause the puffs to collapse.
- Use eggs that are at room temperature since they mix more smoothly.
- To achieve the greatest volume, whip the cream in a bowl that is cold, and stop when the cream holds its shape since cream that is overwhipped becomes grainy.
- Stick the spatula into the dough and see. If it comes off in the form of a firm lump, then a little more egg should be added.
- Make sure that all the puffs are the same size so that they bake at the same rate.
Storage and Reheating
You can store the unfilled shells in a sealed container at room temperature for one day. If you want to store them for a longer period, freeze them for up to one month. To restore the crispness of frozen shells, place them in a 350°F oven for 5 to 8 minutes and then cool them before filling.
Filled puffs must be stored in the refrigerator at 40°F or lower; they are at their best when eaten on the same day and will last for up to two days, although the shell will soften. Whipped cream should not be left at room temperature for more than two hours and filled puffs should not be frozen.
Final Thoughts
Cream puffs may seem difficult, but the main thing you need is patience when working with the dough. After you’ve made them, you’ll end up with a dessert that looks as if it has been baked in a bakery. If you want to serve them at a party, try making a double batch since they sell quickly. For a more light touch, add some fresh berries on the side.
Nutrition Details
Details
- Prep time 50 minutes
- Cook time 40 minutes
- Cooling and chilling 30 minutes
- Total time 2 hours
- Servings 12 puffs (1 per serving)
Nutrient Per serving Whole recipe
- Calories 420 5,040
- Protein 6 g 72 g
- Carbohydrates 31 g 372 g
- Fat 31 g 372 g
- Fiber 2 g 24 g
- Sugar 17 g 204 g
- Sodium 90 mg 1,080 mg
Disclaimer
The nutritional values are only estimates and may vary depending on the brand and the portion size; since all individuals have different nutritional needs, you should consult a doctor or a dietitian if you are following a special diet.